Show or venue management is often a collaborative effort, so you might want to give other people permission to read or edit the information that you store on EdFringeware.
You automatically have full editing rights over any organisations, shows and venues that you create on EdFringeware. EdFringeware also allows you to invite other users to share your information and to set the level of permission that you want to give them.
The two levels of permission are:
Permission options
The permissions you can give others for organisations, shows and venues are:
Organisations
ORGANISATION ADMIN permission allows another user to:
(There is no Organisation Read-only Permission level). |
Shows
SHOW ADMIN permission allows a user to:
SHOW READ-ONLY Permission allows a user to:
|
Venues |
Inviting someone to share information
Inviting another person to have access to your information is done through the 'Invite a contact' box, which are located at different points throughout EdFringeware.
The 'Invite a contact' box usually looks similar to this:
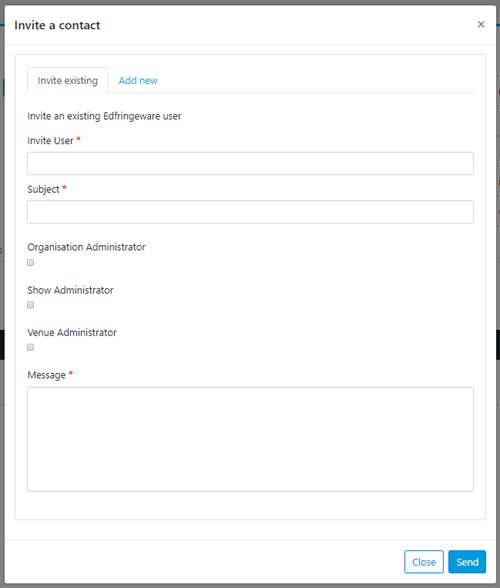
If you start to type an EdFringeware user's name in the Invite Existing field then a drop down box will display all similar names registered with EdFringeware (as long as the user has given their permission) and you can select the one you want.
If the person that you want to invite isn't registered with EdFringeware (or hasn't given their permission for people to find their profile by searching), select Add new towards the top of the invitation box before filling out the rest of the invitation with their contact details.
When you click the Send button the person will receive an email asking them to accept or reject the invitation. If they aren't already an EdFringeware user they will have to register an EdFringeware account before they can share your information.
Once they have accepted your invitation, the next time they login to EdFringeware they will be able to see and edit the information you have shared with them.
In the People tab, within the Organisation, Venue and Show sections you can keep track of the people that you have invited and see whether they have accepted your invitation. You also have the option to delete their access.
How to invite another user to have Admin Permission (full editing rights over your organisation, show or venue)
Go to the organisation that you've created and select the People tab.
Click the Invite a contact button and follow the Invite a user instructions above.
How to invite a user to have Show or Venue Read-only Permission
You can invite one or more people to have read-only access to your shows or venue once they have been created.
Shows
For shows, there are two ways to add Read-only users:
Venues
For venues, go to your organisation and select the Venues tab. Select the venue that you want to share information for and select the People tab.
Click the Invite a contact button and follow the Invite a user instructions above.


